 Cermat Guide
Everything you need to run online classes on Cermat: setting up your site, building interactive material, and keeping track of your students.
Welcome
Cermat has two connected parts.
Logging in the first time
- Open the email from your school about your new account. It contains the site address (for example
your-school.cermat.app), your username and a temporary password. - Open that address, enter the username and password, and click Log in.
- You'll be asked to choose a new password: at least 8 characters, with upper and lower case letters, a number and a symbol.
- School admins land in Studio. Teachers and students land on their courses.
Studio and the course site
Studio is a simple panel for the school's day-to-day work. The course site is the full place to build course content. You can switch any time:
- From Studio to the course site: click Back to site in the left menu, or Open next to a course.
- From the course site to Studio: click Studio in the top bar.
| I want to… | Go to |
|---|---|
| Add students or extend their access | Studio → Students |
| Create a course from a PDF/Word module | Studio → Courses |
| Add my own videos, H5P, files or quizzes | Course site → Edit mode |
| See each student's grades | Course site → Grades |
| Message all students | Studio → Announcements |
| Change the logo, colours or login page | Studio → Appearance |
Home
Your school this week, on one screen.
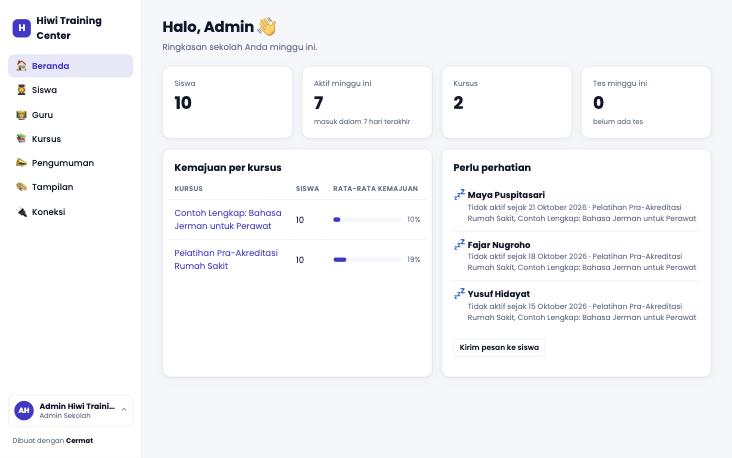
- Students, Active this week (logged in during the last 7 days), Courses, and Tests this week with the pass rate.
- Progress per course: average student progress in each course.
- Needs attention: students who haven't studied for a while, never logged in, or used all their test attempts without passing. Click Message students to remind them straight away.
Courses
Creating a course
- In Studio, open Courses.
- Enter a Course name, for example German A1 – Morning class.
- Click Create & import document. The course is created and you can upload material straight away (see Importing a document). No material yet? Skip it and fill the course later.
Managing courses
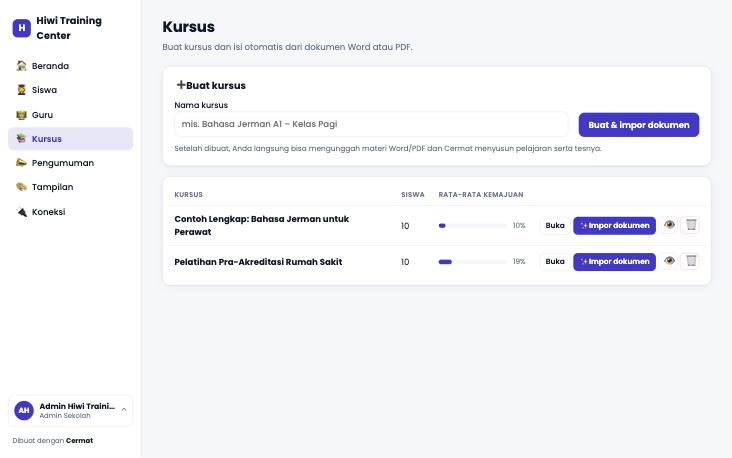
- Open: opens the course on the site, to add or change content.
- ✨ Import document: adds new chapters from a document to an existing course.
- Eye icon (Hide course (archive)): students no longer see the course, but all content and grades are kept. You can show it again any time.
- Bin icon (Delete course): deletes the course with its content and grades. You must type the course name to confirm. This cannot be undone.
Importing a document with AI
Turn the modules you already have into lessons, tests and exams in a few minutes.
- In Studio → Courses, click ✨ Import document on the course you want.
- Choose a Word (.docx) or PDF file: a module, a book, lesson notes, or a list of questions.
- Wait a moment. Cermat reads the document and builds a draft: chapters, lessons, a test per lesson and an exam per chapter.
- On the Review draft page, read everything. Edit the text, and untick any part or question you don't want.
- Click Publish to course. The new chapters are added at the end of the course.
Rules for the generated tests
| Time | Attempts | Pass mark | |
|---|---|---|---|
| Lesson test | 5 minutes | Unlimited | 60 |
| Chapter exam | 10 minutes | 3 | 70 |
The next chapter opens once the student passes the previous chapter's exam. You can change all of these rules later in the quiz settings (see Quizzes).
Students
Adding one student
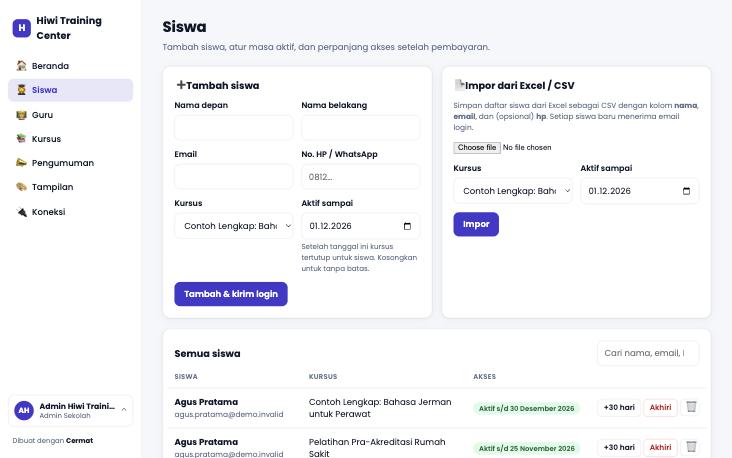
- Studio → Students → Add student.
- Enter first name, last name, email, and mobile/WhatsApp number (for reminders). Choose the course.
- Fill in Active until if access is time-limited (for example, matching the paid period). Leave it empty for no limit.
- Click Add & send login. The student immediately receives an email with the site address and password.
Adding many students from Excel
- In Excel, make columns headed
nama(orname),email, and optionallyhp(phone). - Save as CSV (File → Save as → CSV UTF-8).
- In Studio → Students → Import from Excel / CSV, choose the course and the file, then click Import.
Every new student gets a login email. If a row is wrong (for example an invalid email), Cermat tells you which row.
Access period
- +30 days: extends the student's access by 30 days, for example after payment.
- End: closes the student's access to the course now. Grades and progress are kept.
- Bin icon (Remove from course): removes the student from the course completely.
Use the search box to find students by name, email or phone number.
Teachers
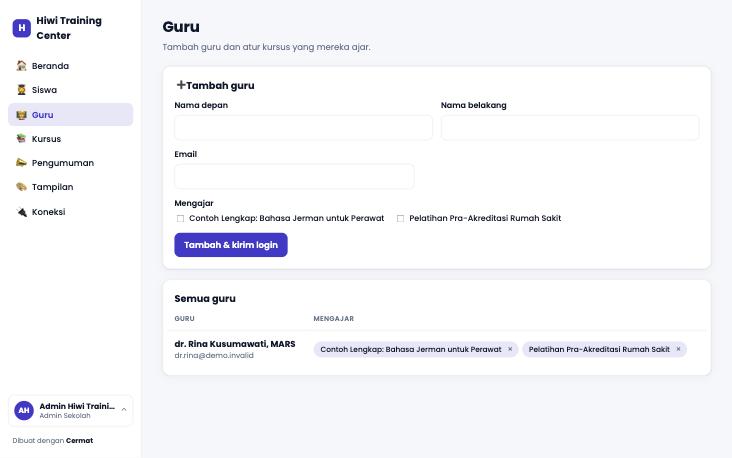
- Studio → Teachers.
- Enter the teacher's name and email, tick their courses under Teaches, and click Add & send login. The teacher receives a login email.
- Under All teachers, each course a teacher teaches is shown as a label. Click × on a label to remove the teacher from that course.
Teachers can change the content of the courses they teach, grade assignments and see student grades. They can't change the school's appearance or the WhatsApp connection.
Announcements
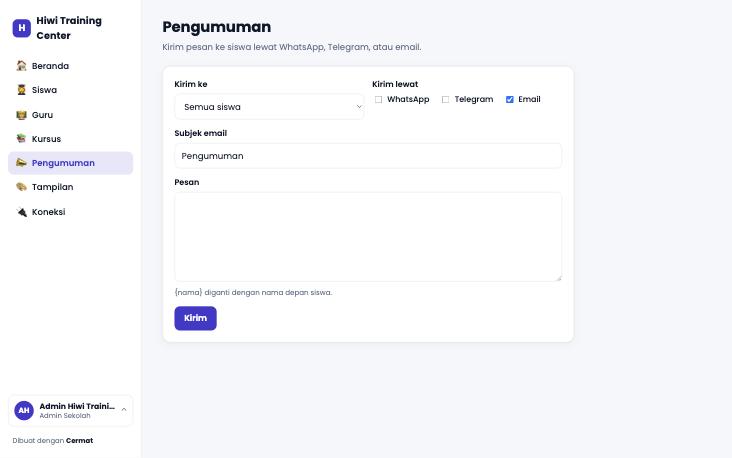
- Studio → Announcements.
- Choose Send to: all students, or the students of one course.
- Tick Send by: WhatsApp, Telegram and/or email (more than one is fine).
- Write the message. Type
{nama}to greet each student by name. - Click Send. You'll see how many messages were sent, failed or skipped (students without a number).
Appearance
Make the site look like your school's own. Changes apply within seconds, emails included.
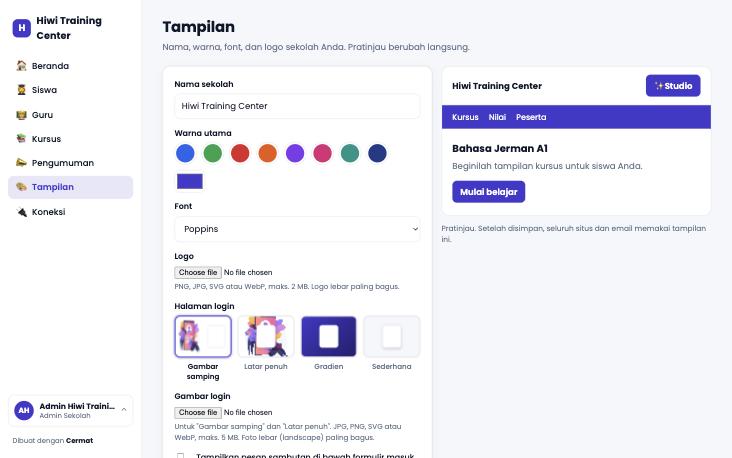
- School name: shown on the site, in the browser tab and in emails.
- Logo: PNG, JPG, SVG or WebP, max 2 MB. Wide logos look best.
- Main colour and font: for buttons, links and headings.
- Login page: choose the Side image, Full background, Gradient or Simple layout, and upload your own login image.
- Welcome message: tick to show a title and text under the login form. Leave the title empty to use the school name.
The preview on the right shows the result before you save. Click Save appearance.
WhatsApp & Telegram
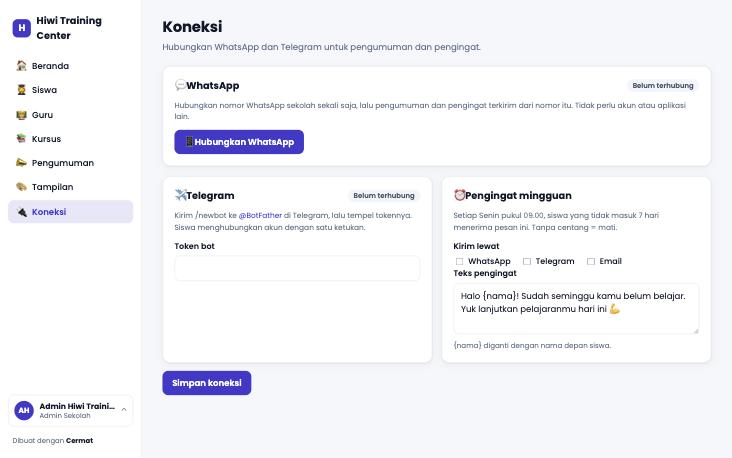
- Studio → Connections → Connect WhatsApp. A QR code appears.
- On the phone with the school's WhatsApp number: open WhatsApp → Linked devices → Link a device, and scan the QR code.
- Once connected, announcements and reminders are sent from your school's number.
Telegram (optional)
- In Telegram, send
/newbotto @BotFather and follow the steps. You'll get a bot token. - Paste the token into Bot token and save.
- Click Connect your own Telegram to test and send a test message.
Weekly reminders
Every Monday at 09:00, students who have been inactive for 7 days get a reminder. Under Weekly reminders, tick the channels to use (no ticks means reminders are off) and edit the text; {nama} becomes the student's name.
Edit mode and sections
To add or change course content, open the course and turn on edit mode.
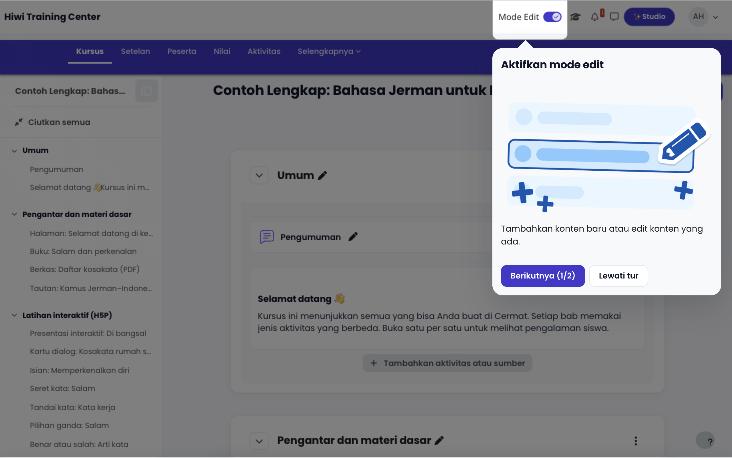
- Open the course (from Studio → Courses → Open).
- Switch on Edit mode at the top right. The first time, Moodle shows a short tour; click Next or Skip tour.
- Each section (chapter) of the course now has a + Add an activity or resource button.
Organising sections
- Add a section: click + Add section below the last section.
- Rename a section: click the pencil icon next to its name.
- Move a section or activity: drag it, or use the ⋮ menu → Move.
- Hide temporarily: ⋮ menu → Hide. Students won't see it until you show it again.
Activities and resources
Click + Add an activity or resource to open the chooser. The ones used most:
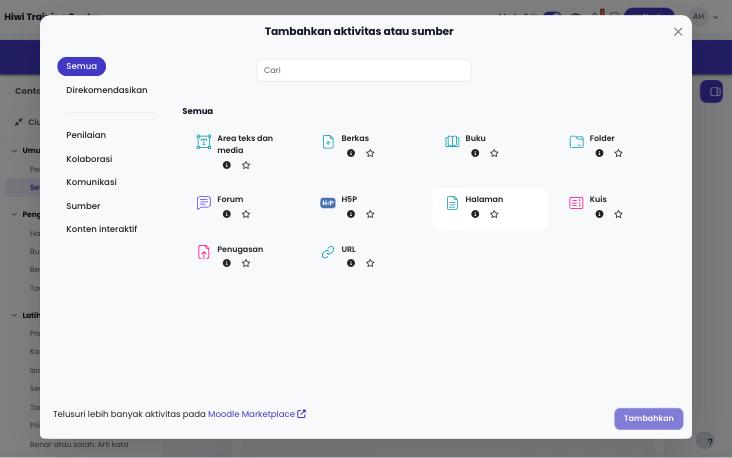
| Type | What it's for | Example |
|---|---|---|
| Page | One page of text, images and video | Chapter introduction, class schedule |
| Book | Long material with sub-chapters | A complete lesson (used by the document import) |
| File | A file to open or download | PDF module, worksheet, audio |
| URL | A link to another site | YouTube video, Google Drive |
| H5P | Interactive material and practice | Presentations, interactive video, vocabulary cards (see H5P) |
| Quiz | Automatically graded tests | Lesson tests, chapter exams, mock exams |
| Assignment | Students upload a file or write an answer; the teacher grades it | Speaking recording, essay, photo of practical work |
| Forum | Discussion and Q&A | Ask the teacher, class announcements |
| Text and media area | Text or images directly on the course page | Small headings, short instructions |
Adding a YouTube video
- Add a Page, then in the editor click the media icon (film) or paste the YouTube link straight into the text.
- Save. The video plays inside the page; students don't have to leave the site.
AI blocks and video
Create one ready-to-use piece of material right on the course page: a quiz, vocabulary cards, fill-in-the-blanks, a presentation, a lesson page or a video.
- Turn on Edit mode in the course (see Edit mode).
- Click + Add an activity or resource where the material should go, then choose the ✨ Create with AI tile.
- Choose the type and enter the topic, how many items, the level and the language of the material. You can also paste source text so the AI uses your own content.
- Click Create, review the result and ask for changes if needed (for example "easier" or "add 2 questions").
- Click Insert into this section. The material appears exactly where you clicked.
Adding a video
Choose the 🎬 Video type, add a title and notes if you like, then either:
- YouTube link: paste the link and click Insert into this section. Free. Use an Unlisted video on YouTube; anyone who has the link can still watch it.
- Upload a file (if your plan includes protected video): choose the file, click Upload, wait for 100%, then Insert. The video plays only on your school's site, with no ads or suggested videos.
H5P: interactive content
H5P makes material students can tap, click and answer: presentations with quizzes, videos that pause to ask questions, vocabulary cards, fill-in-the-blanks, drag and drop, and dozens more. It all works on phones.
H5P lives in two places
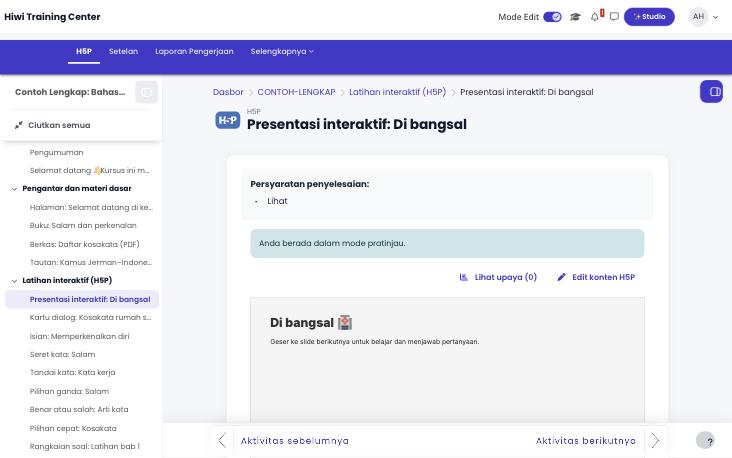
- Content bank: where you create and store H5P content for the course.
- H5P activity: how you show that content in a section, so students can do it and their score is recorded.
Quickest way: create it from the activity
- Open the course and switch on Edit mode.
- In the section you want, click + Add an activity or resource → choose H5P.
- Enter a Name, for example Practice: Greetings and introductions.
- Under Package file, click the file icon → Content bank to pick content you've already made, or drag a
.h5pfile from your computer. - Set Grade (whether the result counts) and Activity completion (for example, complete once attempted), then click Save and display.
Creating new H5P content in the content bank
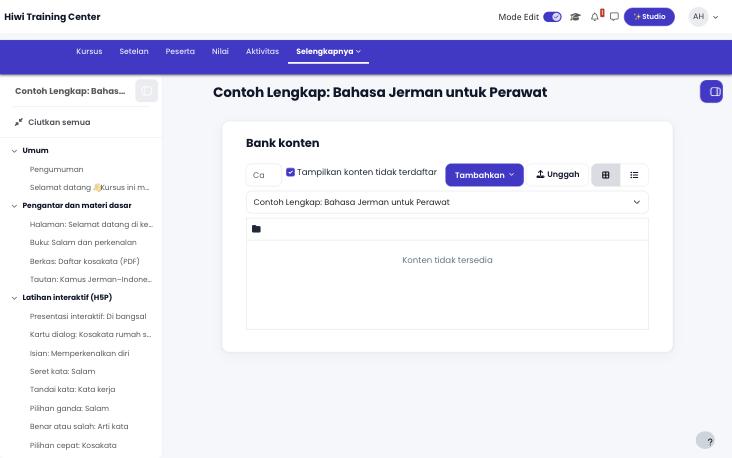
- In the course, open the More menu in the course bar → Content bank.
- Click Add and pick a content type, for example Course Presentation or Flashcards. The most useful types are described below.
- Enter a title and build the content in the editor. Each type has examples and hints in the editor.
- Click Save. The content is stored in the bank and can be previewed.
- Show it in the course by adding an H5P activity and choosing this content from the Content bank (steps above).
Using ready-made H5P content
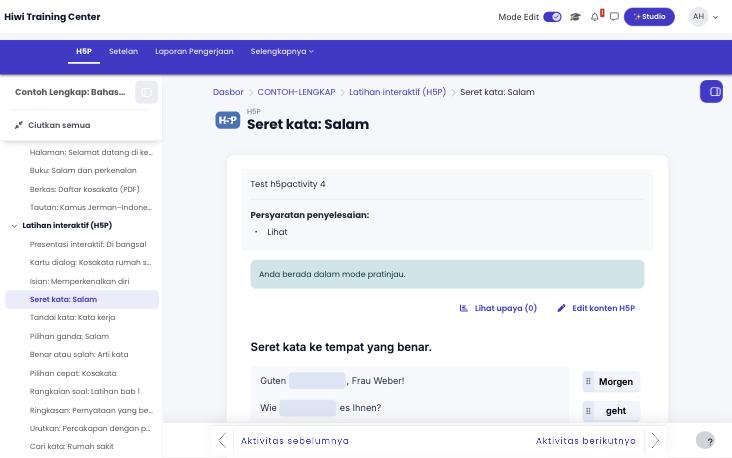
There are many free examples on h5p.org. Download the .h5p file (Reuse → Download as an .h5p file), then upload it in the Content bank → Upload, or directly when adding an H5P activity.
H5P grades
If an H5P activity is set to be graded, students' scores go into the gradebook. Open the activity → the Attempts report tab (or View attempts) to see each student's answers.
The most useful H5P types
| Type (name in the editor) | What it is | Good for |
|---|---|---|
| Course Presentation | PowerPoint-style slides with questions inside | Main lesson material |
| Interactive Book | Several H5P pages combined into one book with contents | A complete chapter in one activity |
| Interactive Video | A video (YouTube or uploaded) that pauses to ask questions | Making sure students really watch |
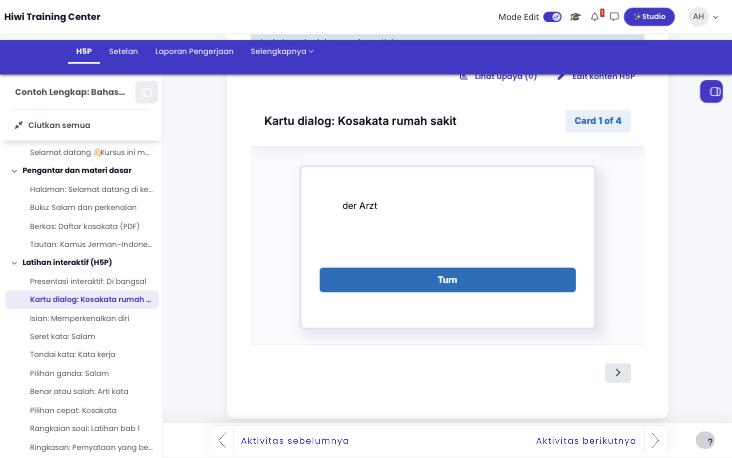
| Flashcards / Dialog Cards | Cards with the answer on the back | Vocabulary, terms, memorising |
| Fill in the Blanks | Text with words to fill in | Grammar, technical terms |
| Drag the Words | Drag words into the right place in a sentence | Sentence structure, conjugation |
| Drag and Drop | Drag images or text onto areas of an image | Labelling body parts, tools, maps |
| Mark the Words | Click particular words in a text | Finding verbs, spotting mistakes |
| Question Set | A series of mixed questions with a final score | Short practice at the end of a lesson |
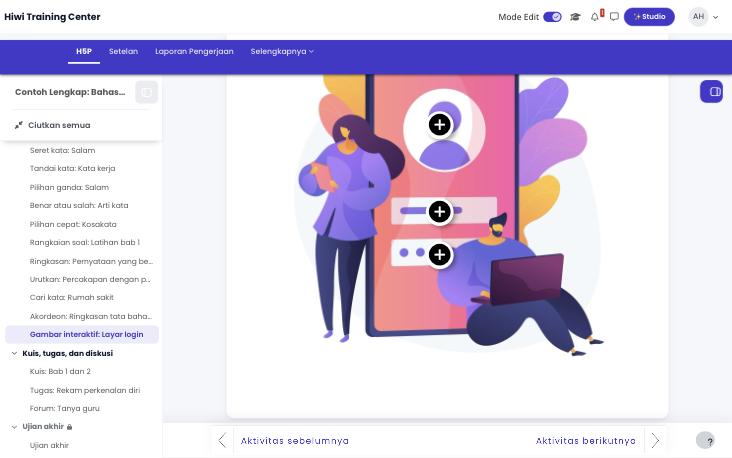
| Image Hotspots | An image with clickable points that explain things | Getting to know a room, a machine, a procedure |
| Speak the Words | Students answer by voice (needs Chrome) | Pronunciation practice |
| Memory Game / Crossword / Find the Words | Matching pairs, crosswords, word search | Variety and warm-ups |
| Branching Scenario | A branching story: the student's choices decide what happens next | Work simulations, patient care, interviews |
| Accordion | Headings that open and close | Summaries, material FAQs |
Quizzes and the question bank
Creating a quiz
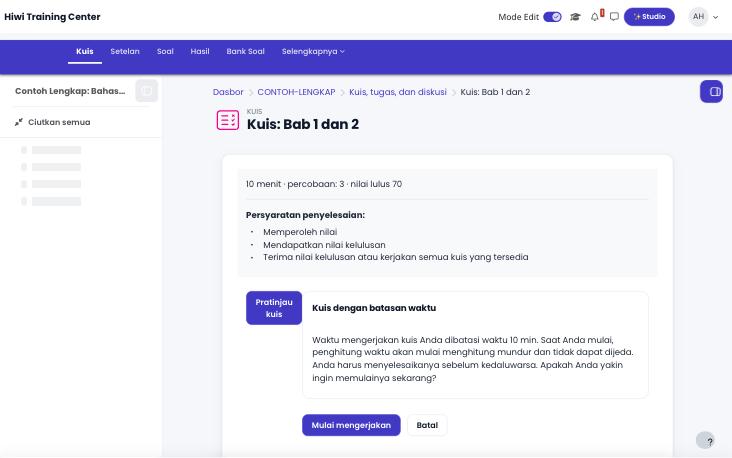
- In Edit mode, click + Add an activity or resource → Quiz.
- Enter a name, then set: Timing (time limit), Grade (pass mark and number of attempts) and Layout (questions per page).
- Click Save and display, then open the Questions tab.
- Click Add → + a new question to write one, or from question bank to reuse existing questions.
Common question types
- Multiple choice: one or more correct answers.
- True/False.
- Short answer: students type the answer; you can enter several accepted answers.
- Matching: pair left and right.
- Essay: a long answer, graded by the teacher.
Changing the rules of imported tests
Open the quiz → Settings. Change the Time limit, Attempts allowed or Grade to pass under Grade, and save.
Assignments
- In Edit mode, click + Add an activity or resource → Assignment.
- Write the instructions. Set a Due date, and under Submission types choose File submissions (photos, PDF, audio) and/or Online text.
- Students upload their answers. Open the assignment → Grade to give a grade and feedback.
Locking content and completion
You can make students study in order.
- Activity completion: in each activity's settings, choose when it counts as done, for example viewed, received a grade or passed. Students see a tick.
- Restrict access: in an activity's or section's settings → Restrict access → Add restriction → Activity completion. Example: Chapter 2 opens once the Chapter 1 exam is passed.
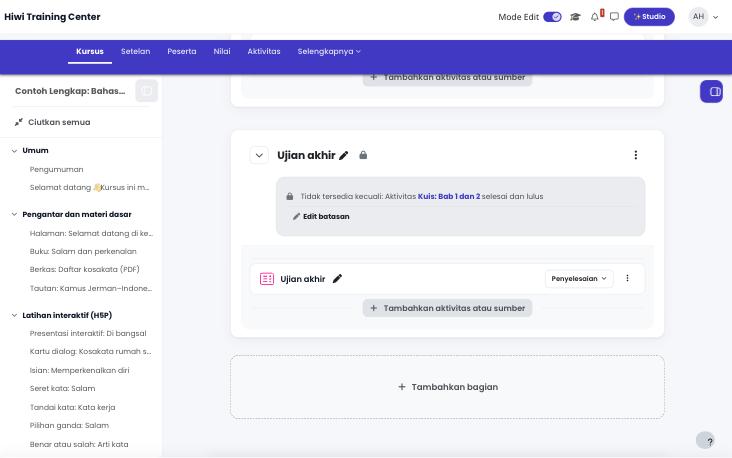
Courses created through the document import are already set up this way: tests open after the lesson is read, the exam after all tests are passed, and the next chapter after the exam is passed.
Grades and reports
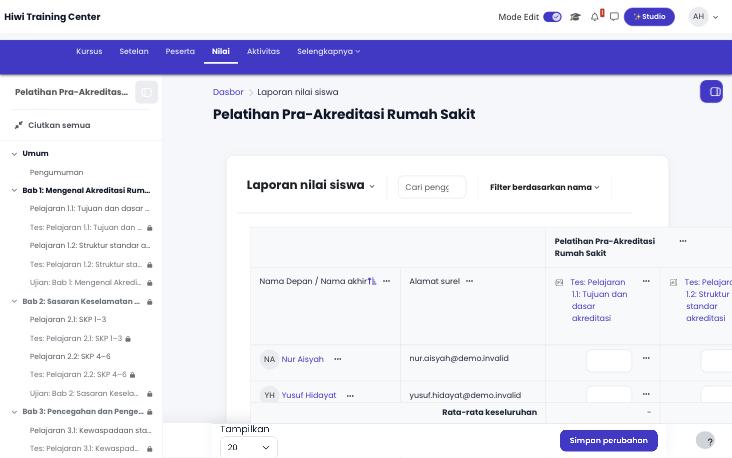
- Studio → Home: average progress per course and students who need attention.
- Gradebook: in the course, open the Grades tab (Grader report). A table of all students and all quiz, H5P and assignment grades. Download it to Excel via Export.
- Quiz results: open the quiz → the Results tab to see every attempt and answer.
- Completion: in the course → Reports → Activity completion to see who has completed what.
What students see
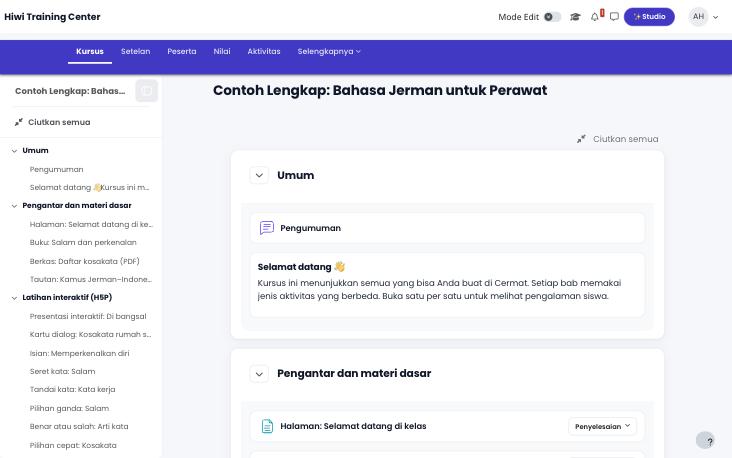
- Students get an email with the site address and password, and log in from a phone or laptop.
- On the front page they see their courses and can pick up where they left off.
- Inside a course, each section holds lessons and tests. Locked items show what's needed to open them, for example Available once Chapter 1 exam is passed.
- If they stop studying for a while, they get a WhatsApp reminder from the school's number.
Common problems
A student can't open the next chapter
The chapter is locked until the previous chapter's exam is passed. Check the student's grade on that quiz. If they've used all their attempts, they appear under Needs attention. You can give an extra attempt: open the quiz → More → User overrides.
A student didn't get the login email
Ask the student to check their Spam/Promotions folder. Make sure the email address is correct in Studio → Students. Students can also click Lost password? on the login page.
A student forgot their password
On the login page, click Lost password? and enter the email. A link to set a new password is sent to that email.
WhatsApp reminders aren't being sent
Open Studio → Connections. If WhatsApp says Not connected, connect it again with the QR code. Make sure students' phone numbers are complete, for example with the country code.
H5P is blank or doesn't show
H5P content loads a moment after the page, below the activity description. Wait a few seconds or reload the page. If it's still empty, open the content in the Content bank to make sure it was saved correctly, then choose it again in the H5P activity.
The new logo or colour isn't showing yet
Reload the page (or close and reopen the browser). Appearance changes apply within seconds.
Contact us
Can't find the answer? Email [email protected]. Include your school's site address and, if you can, a screenshot of the problem.